Overview
If you need to manually install an app on your jailbroken iPhone (that is, install something without using Installer), you need to do the following things:
1. Download and unzip the file you want to install onto your home computer
2. Copy the .app folder into the /Applications directory on your iPhone (using SSH or whatever else works)
3. Set the permissions on the .app folder and the executable inside that folder.
The best way to do steps 2 & 3 are with an SSH program. This is free software you run on your home computer. (If you use Windows, you can use "PuTTY" and "WinSCP"...download and install both of them.) It interacts with a program on your iPhone called OpenSSH (which you very well may already have...if you don't, you can get it on Installer...use the "Services" program to turn SSH on and off.)
You can also use your SSH program to set permissions of the files (step #3). However, if you use a different method that doesn't allow this, you can also set the permissions using MobileFinder.
Setting permissions on your iPhone
This is a quick run-through on how to set the permissions on an app by using MobileFinder. The app that we will change the permissions on is Funiculus. (Remember, if you are using Installer, this isn't necessary--Installer does this for you automatically. This is only for manual installations.)
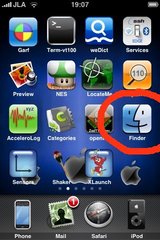 First, make sure you have MobileFinder. It is available on Installer. Run it.
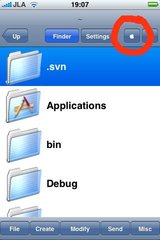 Click on the Apple button at the top.

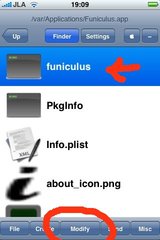
In the "Funiculus.app" folder, find the executable file. In this case, it is called simply "funiculus". You need to do the same thing you did for the "Funiculus.app" folder...first highlight it, and then hit the Modify button. Make sure all the "Exec" buttons are selected. And then hit "Done".
You have now set the permissions for both the folder and the executable. You should be able to run it.
If you need to manually install an app on your jailbroken iPhone (that is, install something without using Installer), you need to do the following things:
1. Download and unzip the file you want to install onto your home computer
2. Copy the .app folder into the /Applications directory on your iPhone (using SSH or whatever else works)
3. Set the permissions on the .app folder and the executable inside that folder.
The best way to do steps 2 & 3 are with an SSH program. This is free software you run on your home computer. (If you use Windows, you can use "PuTTY" and "WinSCP"...download and install both of them.) It interacts with a program on your iPhone called OpenSSH (which you very well may already have...if you don't, you can get it on Installer...use the "Services" program to turn SSH on and off.)
You can also use your SSH program to set permissions of the files (step #3). However, if you use a different method that doesn't allow this, you can also set the permissions using MobileFinder.
Setting permissions on your iPhone
This is a quick run-through on how to set the permissions on an app by using MobileFinder. The app that we will change the permissions on is Funiculus. (Remember, if you are using Installer, this isn't necessary--Installer does this for you automatically. This is only for manual installations.)
First, make sure you have MobileFinder. It is available on Installer. Run it.Click on the Apple button at the top.After clicking on the Apple button, you should find yourself on a screen with an Applications folder. Click on it and open it up.
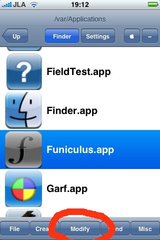
In the Applications directory, scroll down to find the application we want...in this case, Funiculus. After you have highlighted it, press the "Modify" button at the bottom of the screen.
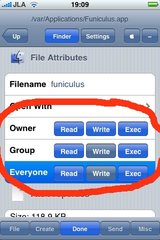
You should now see the properties of the Funiculus.app folder. Look for the three rows entitled "Owner", "Group", and "Everyone". Make sure it looks like the picture on the left. It should have all of the "Read" buttons selected, as well as all of the "Exec" buttons. After you have done this, click "Done" at the bottom.
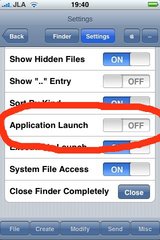
You will now be back in the Applications directory. We now need to go inside the Funiculus folder. In order to prevent MobileFinder from running the app when you click on it, you need to first press the "Settings" button at the top of the screen.
You will now be back in the Applications directory. We now need to go inside the Funiculus folder. In order to prevent MobileFinder from running the app when you click on it, you need to first press the "Settings" button at the top of the screen.
In the Settings menu, make sure "Application Launch" is off. If not, rather than show you the contents of the app folder, it will launch the app. We don't want this.
Leave settings by clicking on "Finder".
Back in the Applications directory, double-click on the "Funiculus.app" folder to open it.
Leave settings by clicking on "Finder".
Back in the Applications directory, double-click on the "Funiculus.app" folder to open it.
In the "Funiculus.app" folder, find the executable file. In this case, it is called simply "funiculus". You need to do the same thing you did for the "Funiculus.app" folder...first highlight it, and then hit the Modify button. Make sure all the "Exec" buttons are selected. And then hit "Done".
You have now set the permissions for both the folder and the executable. You should be able to run it.


Leave a comment